Authentic Edge: Mastering the Grunge Textures Vector Pack
There is a specific kind of polish that comes from embracing the unpolished. In the world of digital design, where vectors are mathematically perfect and pixels are grid-aligned, we often struggle to replicate the authenticity of the real world. This is exactly why the Grunge Textures Vector Pack has become a staple in my daily workflow. It is not just a set of overlays; it is a bridge between high-end digital precision and the tactile reality of surfaces we touch every day. These assets originated from high-resolution photographs of actual physical surfaces—concrete, paper, rust, and noise—carefully rendered to ensure they work flawlessly in a vector environment.
The Power of Scalable Authenticity
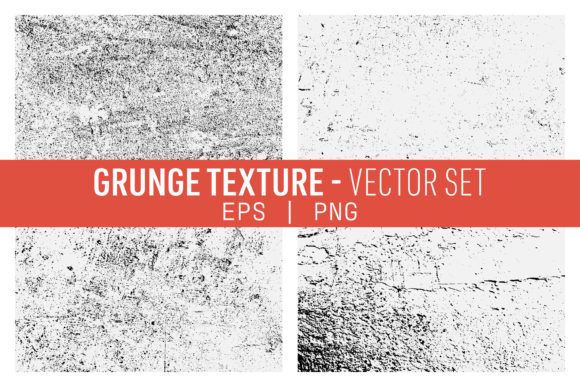
One of the biggest headaches in design is resolution dependency. You find a perfect distressed texture, blow it up for a large format print, and suddenly it looks like a blurry mess. The core advantage of this collection is that it is delivered in EPS format, meaning these are true vectors. You can scale them to the size of a billboard or shrink them down for a favicon without losing a single ounce of detail. This makes the Grunge Textures Vector Pack an incredibly versatile asset for professional work. Whether you are using Adobe Illustrator, Corel Draw, or Inkscape, the ability to ungroup, recolor, and manipulate individual elements of the texture allows for infinite customization.
However, the creator understood that not everyone lives in a vector environment. If you are a Photoshop user or working on raster-heavy projects, the pack includes high-quality PNG files at 300 DPI with transparent backgrounds. This dual-format approach ensures that regardless of your software preference, you have immediate access to gritty, high-quality overlays.
Where Grit Meets Strategy: Practical Applications
When we talk about modern typography and brand identity, we often focus on the font itself—choosing between a serif font for tradition or a sans serif font for modernity. But the environment in which that type lives is just as important. The Grunge Textures Vector Pack excels at adding personality to otherwise sterile layouts. Here is how I recommend using these assets across different sectors:
- Logo Design and Branding: If you are building a brand for a coffee roaster, a vintage clothing line, or an indie rock band, a pristine logo feels out of place. Applying a subtle grunge overlay creates a vintage or retro feel that suggests history and durability. It signals to the audience that the brand has character.
- Editorial and Packaging Design: In packaging design, shelf presence is everything. Textures add depth and tactile quality to flat prints. For editorial design, using these vectors as background layers behind pull quotes or chapter headings can break the monotony of long-form text and improve visual hierarchy.
- Digital and Web Design: In web design, heavy textures can slow down load times, but vector grunge elements used as SVGs are lightweight and crisp. They work wonderfully for hero sections or call-to-action buttons, giving social media graphics and websites a raw, energetic vibe that stops the scroll.
Enhancing Visual Hierarchy and Readability
It seems counterintuitive, but adding "dirt" to your design can actually improve clarity. Visual hierarchy relies on contrast. By applying a texture to the background, you create a separation between the foreground elements (like your headlines or product shots) and the rest of the page. This is particularly useful when pairing fonts. For example, if you have a delicate script font or a handwritten font for a header, placing it over a solid color can feel flat. Placing it over a distressed texture from this pack adds weight and context, ensuring the typography stands out without clashing.
Furthermore, these textures allow you to control the "temperature" of your design. A clean, white background feels clinical and corporate. A background treated with a light paper grain or a subtle concrete wash feels warmer, more inviting, and more human. This psychological shift is crucial for entrepreneurs and marketers trying to build trust with their audience.
Workflow Integration and Best Practices
To get the most out of the Grunge Textures Vector Pack, you need to treat them as design assets, not just filters. Here is a practical guide for integration:
- Color Mode Manipulation: Because these are vectors, you aren't stuck with black or grey. You can change the fill color to match your brand’s palette. Imagine a navy blue grunge texture overlaid on a pastel background—it’s a sophisticated way to add grit while maintaining brand consistency.
- Opacity and Blending: Rarely should you use a grunge texture at 100% opacity unless you are going for a heavy industrial look. Experiment with Multiply or Overlay blending modes at 20-40% opacity for a subtle, professional finish.
- Combining Elements: The pack contains four distinct textures. Don't just use them as they are. Ungroup the vector elements and combine parts of Texture A with Texture B to create a unique surface that no other designer has.
For content creators and bloggers, these textures are a quick way to create a cohesive aesthetic across Pinterest pins and Instagram stories. Instead of using generic stock backgrounds, a custom-distressed background makes your content recognizable instantly.
Final Thoughts on Texture Selection
Choosing the right texture is about matching the mood. This pack is described as the "best of the best," curated over a long period of testing, and that quality is visible. There are no jagged edges or artificial-looking patterns. These look like they were pulled from a darkroom floor or an old print shop. When evaluating if this fits your project, ask yourself: Does my design need to feel "lived in"? If the answer is yes, then the Grunge Textures Vector Pack is the tool you need. It transforms flat digital art into something with soul, making it an essential part of any designer's toolkit.